Echarts数据大屏
可视化面板介绍
应对现在数据可视化的趋势,越来越多企业需要在很多场景(营销数据,生产数据,用户数据)下使用,可视化图表来展示体现数据,让数据更加直观,数据特点更加突出。
01-使用技术
div + css 布局
flex 布局
Less
原生js + jquery 使用
rem适配
echarts基础
02- 案例适配方案
设计稿是1920px
flexible.js 把屏幕分为 24 等份
cssrem 插件的基准值是 80px
插件-配置按钮---配置扩展设置--Root Font Size 里面 设置。
但是别忘记重启vscode软件保证生效
03-基础设置
body 设置背景图 ,缩放为 100% , 行高1.15
css初始化

04-header 布局
高度为100px
背景图,在容器内显示
缩放比例为 100%
h1 标题部分 白色 38像素 居中显示 行高为 80像素
时间模块 showTime 定位右侧 right 为 30px 行高为 75px 文字颜色为:rgba(255, 255, 255, 0.7) 而文字大小为 20像素
// 格式: 当前时间:2020年3月17-0时54分14秒
<script>
            var t = null;
            t = setTimeout(time, 1000);//開始运行
            function time() {
                clearTimeout(t);//清除定时器
                dt = new Date();
                var y = dt.getFullYear();
                var mt = dt.getMonth() + 1;
                var day = dt.getDate();
                var h = dt.getHours();//获取时
                var m = dt.getMinutes();//获取分
                var s = dt.getSeconds();//获取秒
                document.querySelector(".showTime").innerHTML = '当前时间:' + y + "年" + mt + "月" + day + "-" + h + "时" + m + "分" + s + "秒";
                t = setTimeout(time, 1000); //设定定时器,循环运行
            }
 </script>
header部分css样式
header {
  position: relative;
  height: 1.25rem;
  background: url(../images/head_bg.png) no-repeat top center;
  background-size: 100% 100%;
  h1 {
    font-size: 0.475rem;
    color: #fff;
    text-align: center;
    line-height: 1rem;
  }
  .showTime {
    position: absolute;
    top: 0;
    right: 0.375rem;
    line-height: 0.9375rem;
    font-size: 0.25rem;
    color: rgba(255, 255, 255, 0.7);
  }
}
05-mainbox 主体模块
需要一个上左右的10px 的内边距
column 列容器,分三列,占比 3:5:3
css样式:
.mainbox {
  padding: 0.125rem 0.125rem 0;
  display: flex;
  .column {
    flex: 3;
  }
  &:nth-child(2) {
    flex: 5;
  }
}
06-公共面板模块 panel
高度为 310px
1像素的 1px solid rgba(25, 186, 139, 0.17) 边框
有line.jpg 背景图片
padding为 上为 0 左右 15px 下为 40px
下外边距是 15px
利用panel 盒子 before 和after 制作上面两个角 大小为 10px 线条为 2px solid #02a6b5
新加一个盒子before 和after 制作下侧两个角 宽度高度为 10px
.panel {
  position: relative;
  height: 3.875rem;
  border: 1px solid rgba(25, 186, 139, 0.17);
  background: url(../images/line\(1\).png);
  padding: 0 0.1875rem 0.5rem;
  margin-bottom: 0.1875rem;
  &::before {
    position: absolute;
    top: 0;
    left: 0;
    content: "";
    width: 10px;
    height: 10px;
    border-top: 2px solid #02a6b5;
    border-left: 2px solid #02a6b5;
  }
  &::after {
    position: absolute;
    top: 0;
    right: 0;
    content: "";
    width: 10px;
    height: 10px;
    border-top: 2px solid #02a6b5;
    border-right: 2px solid #02a6b5;
  }
  .panel-footer {
    position: absolute;
    left: 0;
    bottom: 0;
    width: 100%;
    &::before {
      position: absolute;
      bottom: 0;
      left: 0;
      content: "";
      width: 10px;
      height: 10px;
      border-bottom: 2px solid #02a6b5;
      border-left: 2px solid #02a6b5;
    }
    &::after {
      position: absolute;
      bottom: 0;
      right: 0;
      content: "";
      width: 10px;
      height: 10px;
      border-bottom: 2px solid #02a6b5;
      border-right: 2px solid #02a6b5;
    }
  }
}
07-柱形图 bar 模块(布局)
标题模块 h2 高度为 48px 文字颜色为白色 文字大小为 20px
图标内容模块 chart 高度 240px
以上可以作为panel公共样式部分
  h2 {
    height: 0.6rem;
    line-height: 0.6rem;
    text-align: center;
    color: #fff;
    font-size: 20px;
    font-weight: 400;
  }
  .chart {
    height: 3rem;
    background-color: pink;
  }
08-中间布局
上面是no 数字模块
下面是map 地图模块
数字模块 no 有个背景颜色 rgba(101, 132, 226, 0.1); 有个15像素的内边距
注意中间列 column 有个 左右 10px 下 15px 的外边距
no 模块里面上下划分 上面是数字(no-hd) 下面 是 相关文字说明(no-bd)
no-hd 数字模块 有一个边框 1px solid rgba(25, 186, 139, 0.17)
no-hd 数字模块 里面分为两个小li 每个小li高度为 80px 文字大小为 70px 颜色为 #ffeb7b 字体是图标字体 electronicFont
no-hd 利用 after 和 before制作2个小角, 边框 2px solid #02a6b5 宽度为 30px 高度为 10px
小竖线 给 第一个小li after 就可以 1px宽 背景颜色为 rgba(255, 255, 255, 0.2); 高度 50% top 25% 即可
no-bd 里面也有两个小li 高度为 40px 文字颜色为 rgba(255, 255, 255, 0.7) 文字大小为 18px 上内边距为 10px
/* 声明字体*/
@font-face {
  font-family: electronicFont;
  src: url(../font/DS-DIGIT.TTF);
}
地图模块制作:
地图模块高度为 810px 里面包含4个盒子 chart 放图表模块 球体盒子 旋转1 旋转2
球体图片模块 map1 大小为 518px 要加背景图片 因为要缩放100% 定位到最中央 透明度 .3
旋转1 map 2 大小为 643px 要加背景图片 因为要缩放100% 定位到中央 透明度 .6 做旋转动画 利用z-index压住球体
旋转2 map3 大小为 566px 要加背景图片 因为要缩放100% 定位到中央 旋转动画 注意是逆时针
 <div class="no">
                <div class="no-hd">
                    <ul>
                        <li>125811</li>
                        <li>104563</li>
                    </ul>
                </div>
                <div class="no-bd">
                    <ul>
                        <li>前端需求人数</li>
                        <li>市场供应人数</li>
                    </ul>
                </div>
            </div>
            <div class="map">
                <div class="chart"></div>
                <div class="map1"></div>
                <div class="map2"></div>
                <div class="map3"></div>
            </div>
中间样式
/* 声明字体*/
@font-face {
  font-family: electronicFont;
  src: url(../font/DS-DIGIT.TTF);
}
.no {
  background: rgba(101, 132, 226, 0.1);
  padding: 0.1875rem;
  .no-hd {
    position: relative;
    border: 1px solid rgba(25, 186, 139, 0.17);
    &::before {
      content: "";
      position: absolute;
      width: 30px;
      height: 10px;
      border-top: 2px solid #02a6b5;
      border-left: 2px solid #02a6b5;
      top: 0;
      left: 0;
    }
    &::after {
      content: "";
      position: absolute;
      width: 30px;
      height: 10px;
      border-bottom: 2px solid #02a6b5;
      border-right: 2px solid #02a6b5;
      right: 0;
      bottom: 0;
    }
    ul {
      display: flex;
      li {
        position: relative;
        flex: 1;
        text-align: center;
        height: 1rem;
        line-height: 1rem;
        font-size: 0.875rem;
        color: #ffeb7b;
        padding: 0.05rem 0;
        font-family: electronicFont;
        font-weight: bold;
        &:first-child::after {
          content: "";
          position: absolute;
          height: 50%;
          width: 1px;
          background: rgba(255, 255, 255, 0.2);
          right: 0;
          top: 25%;
        }
      }
    }
  }
  .no-bd ul {
    display: flex;
    li {
      flex: 1;
      height: 0.5rem;
      line-height: 0.5rem;
      text-align: center;
      font-size: 0.225rem;
      color: rgba(255, 255, 255, 0.7);
      padding-top: 0.125rem;
    }
  }
}
.map {
  position: relative;
  height: 10.125rem;
  .chart {
    position: absolute;
    top: 0;
    left: 0;
    z-index: 5;
    height: 10.125rem;
    width: 100%;
  }
  .map1,
  .map2,
  .map3 {
    position: absolute;
    top: 50%;
    left: 50%;
    transform: translate(-50%, -50%);
    width: 6.475rem;
    height: 6.475rem;
    background: url(../images/map.png) no-repeat;
    background-size: 100% 100%;
    opacity: 0.3;
  }
  .map2 {
    width: 8.0375rem;
    height: 8.0375rem;
    background-image: url(../images/lbx.png);
    opacity: 0.6;
    animation: rotate 15s linear infinite;
    z-index: 2;
  }
  .map3 {
    width: 7.075rem;
    height: 7.075rem;
    background-image: url(../images/jt.png);
    animation: rotate1 10s linear infinite;
  }

  @keyframes rotate {
    from {
      transform: translate(-50%, -50%) rotate(0deg);
    }
    to {
      transform: translate(-50%, -50%) rotate(360deg);
    }
  }
  @keyframes rotate1 {
    from {
      transform: translate(-50%, -50%) rotate(0deg);
    }
    to {
      transform: translate(-50%, -50%) rotate(-360deg);
    }
  }
}
09-Echarts-介绍
常见的数据可视化库:
D3.js 目前 Web 端评价最高的 Javascript 可视化工具库(入手难)
ECharts.js 百度出品的一个开源 Javascript 数据可视化库
Highcharts.js 国外的前端数据可视化库,非商用免费,被许多国外大公司所使用
AntV 蚂蚁金服全新一代数据可视化解决方案 等等
Highcharts 和 Echarts 就像是 Office 和 WPS 的关系
ECharts,一个使用 JavaScript 实现的开源可视化库,可以流畅的运行在 PC 和移动设备上,兼容当前绝大部分浏览器(IE8/9/10/11,Chrome,Firefox,Safari等),底层依赖矢量图形库 ZRender,提供直观,交互丰富,可高度个性化定制的数据可视化图表。
大白话:
是一个JS插件
性能好可流畅运行PC与移动设备
兼容主流浏览器
提供很多常用图表,且可定制。
折线图、柱状图、散点图、饼图、K线图
官网地址:https://www.echartsjs.com/zh/index.html
10-Echarts-体验
官方教程:[五分钟上手ECharts](https://www.echartsjs.com/zh/tutorial.html#5 分钟上手 ECharts)
下载echarts https://github.com/apache/incubator-echarts/tree/4.5.0
使用步骤:
引入echarts 插件文件到html页面中
准备一个具备大小的DOM容器
<div id="main" style="width: 600px;height:400px;"></div>
初始化echarts实例对象
var myChart = echarts.init(document.getElementById('main'));
指定配置项和数据(option)
var option = {
    xAxis: {
        type: 'category',
        data: ['Mon', 'Tue', 'Wed', 'Thu', 'Fri', 'Sat', 'Sun']
    },
    yAxis: {
        type: 'value'
    },
    series: [{
        data: [820, 932, 901, 934, 1290, 1330, 1320],
        type: 'line'
    }]
};
将配置项设置给echarts实例对象
myChart.setOption(option);
11-Echarts-基础配置
这是要求同学们知道以下配置每个模块的主要作用干什么的就可以了
需要了解的主要配置:
seriesxAxisyAxisgridtooltiptitlelegendcolor
series
系列列表。每个系列通过
type决定自己的图表类型大白话:图标数据,指定什么类型的图标,可以多个图表重叠。
xAxis:直角坐标系 grid 中的 x 轴
boundaryGap: 坐标轴两边留白策略 true,这时候刻度只是作为分隔线,标签和数据点都会在两个刻度之间的带(band)中间。
yAxis:直角坐标系 grid 中的 y 轴
grid:直角坐标系内绘图网格。
title:标题组件
tooltip:提示框组件
legend:图例组件
color:调色盘颜色列表
数据堆叠,同个类目轴上系列配置相同的
stack值后 后一个系列的值会在前一个系列的值上相加。一般情况下不需要设置
option = {
    // color设置我们线条的颜色 注意后面是个数组
    color: ['pink', 'red', 'green', 'skyblue'],
    // 设置图表的标题
    title: {
        text: '折线图堆叠123'
    },
    // 图表的提示框组件
    tooltip: {
        // 触发方式
        trigger: 'axis'
    },
    // 图例组件
    legend: {
       // series里面有了 name值则 legend里面的data可以删掉
    },
    // 网格配置  grid可以控制线形图 柱状图 图表大小
    grid: {
        left: '3%',
        right: '4%',
        bottom: '3%',
        // 是否显示刻度标签 如果是true 就显示 否则反之
        containLabel: true
    },
    // 工具箱组件  可以另存为图片等功能
    toolbox: {
        feature: {
            saveAsImage: {}
        }
    },
    // 设置x轴的相关配置
    xAxis: {
        type: 'category',
        // 是否让我们的线条和坐标轴有缝隙
        boundaryGap: false,
        data: ['星期一', '周二', '周三', '周四', '周五', '周六', '周日']
    },
     // 设置y轴的相关配置
    yAxis: {
        type: 'value'
    },
    // 系列图表配置 它决定着显示那种类型的图表
    series: [
        {
            name: '邮件营销',
            type: 'line',

            data: [120, 132, 101, 134, 90, 230, 210]
        },
        {
            name: '联盟广告',
            type: 'line',

            data: [220, 182, 191, 234, 290, 330, 310]
        },
        {
            name: '视频广告',
            type: 'line',

            data: [150, 232, 201, 154, 190, 330, 410]
        },
        {
            name: '直接访问',
            type: 'line',

            data: [320, 332, 301, 334, 390, 330, 320]
        }
    ]
};
12- 柱状图图表(两大步骤)
官网找到类似实例, 适当分析,并且引入到HTML页面中
根据需求定制图表
引入到html页面中
// 柱状图1模块
(function() {
  // 实例化对象
  let myChart = echarts.init(document.querySelector(".bar .chart"));
  // 指定配置和数据
  let option = {
    color: ["#3398DB"],
    tooltip: {
      trigger: "axis",
      axisPointer: {
        // 坐标轴指示器,坐标轴触发有效
        type: "shadow" // 默认为直线,可选为:'line' | 'shadow'
      }
    },
    grid: {
      left: "3%",
      right: "4%",
      bottom: "3%",
      containLabel: true
    },
    xAxis: [
      {
        type: "category",
        data: ["Mon", "Tue", "Wed", "Thu", "Fri", "Sat", "Sun"],
        axisTick: {
          alignWithLabel: true
        }
      }
    ],
    yAxis: [
      {
        type: "value"
      }
    ],
    series: [
      {
        name: "直接访问",
        type: "bar",
        barWidth: "60%",
        data: [10, 52, 200, 334, 390, 330, 220]
      }
    ]
  };

  // 把配置给实例对象
  myChart.setOption(option);
})();
根据需求定制
修改图表柱形颜色 #2f89cf
修改图表大小 top 为 10px bottom 为 4% grid决定我们的柱状图的大小
color: ["#2f89cf"],
grid: {
  left: "0%",
  top: "10px",
  right: "0%",
  bottom: "4%",
  containLabel: true
},
X轴相关设置 xAxis
文本颜色设置为 rgba(255,255,255,.6) 字体大小为 12px
X轴线的样式 不显示
// 设置x轴标签文字样式
// x轴的文字颜色和大小
axisLabel: {
color: "rgba(255,255,255,.6)",
fontSize: "12"
},
// x轴样式不显示
axisLine: {
show: false
// 如果想要设置单独的线条样式
// lineStyle: {
// color: "rgba(255,255,255,.1)",
// width: 1,
// type: "solid"
}
}
   - Y 轴相关定制
     - 文本颜色设置为   rgba(255,255,255,.6)   字体大小为 12px
     - Y 轴线条样式 更改为  1像素的  rgba(255,255,255,.1) 边框
     - 分隔线的颜色修饰为  1像素的  rgba(255,255,255,.1)

   ~~~JavaScript
   // y 轴文字标签样式
   axisLabel: {
         color: "rgba(255,255,255,.6)",
          fontSize: "12"
   },
    // y轴线条样式
    axisLine: {
         lineStyle: {
            color: "rgba(255,255,255,.1)",
            // width: 1,
            // type: "solid"
         }
   5232},
    // y 轴分隔线样式
   splitLine: {
       lineStyle: {
          color: "rgba(255,255,255,.1)"
        }
   }
修改柱形为圆角以及柱子宽度 series 里面设置
   series: [
         {
           name: "直接访问",
           type: "bar",
           // 修改柱子宽度
           barWidth: "35%",
           data: [10, 52, 200, 334, 390, 330, 220],
           itemStyle: {
             // 修改柱子圆角
             barBorderRadius: 5
           }
         }
       ]
     };
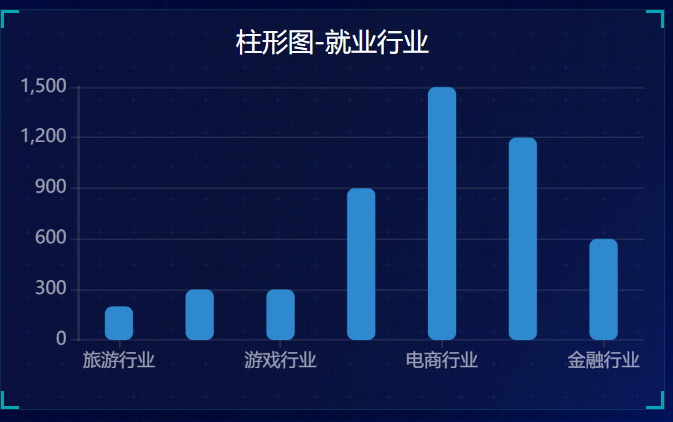
更换对应数据
   // x轴中更换data数据
    data: [ "旅游行业","教育培训", "游戏行业", "医疗行业", "电商行业", "社交行业", "金融行业" ],
   // series 更换数据
    data: [200, 300, 300, 900, 1500, 1200, 600]
让图表跟随屏幕自适应
  window.addEventListener("resize", function() {
    myChart.resize();
  });
13-柱状图2定制

官网找到类似实例, 适当分析,并且引入到HTML页面中
根据需求定制图表
需求1: 修改图形大小 grid
  // 图标位置
    grid: {
      top: "10%",
      left: "22%",
      bottom: "10%"
    },
需求2: 不显示x轴
   xAxis: {
      show: false
    },
需求3: y轴相关定制
不显示y轴线和相关刻度
//不显示y轴线条
axisLine: {
    show: false
        },
// 不显示刻度
axisTick: {
   show: false
},
y轴文字的颜色设置为白色
   axisLabel: {
          color: "#fff"
   },
需求4: 修改第一组柱子相关样式(条状)
name: "条",
// 柱子之间的距离
barCategoryGap: 50,
//柱子的宽度
barWidth: 10,
// 柱子设为圆角
itemStyle: {
    normal: {
      barBorderRadius: 20,
    }
},
设置第一组柱子内百分比显示数据
// 图形上的文本标签
label: {
    normal: {
         show: true,
         // 图形内显示
         position: "inside",
         // 文字的显示格式
         formatter: "{c}%"
     }
},
设置第一组柱子不同颜色
// 声明颜色数组
var myColor = ["#1089E7", "#F57474", "#56D0E3", "#F8B448", "#8B78F6"];
// 2. 给 itemStyle  里面的color 属性设置一个 返回值函数
  itemStyle: {
          normal: {
            barBorderRadius: 20,
            // params 传进来的是柱子对象
            console.log(params);
            // dataIndex 是当前柱子的索引号
            return myColor[params.dataIndex];
          }

},
需求5: 修改第二组柱子的相关配置(框状)
  	    name: "框",
        type: "bar",
        barCategoryGap: 50,
        barWidth: 15,
        itemStyle: {
            color: "none",
            borderColor: "#00c1de",
            borderWidth: 3,
            barBorderRadius: 15
        },
        data: [19325, 23438, 31000, 121594, 134141, 681807]
      }
需求6: 给y轴添加第二组数据
yAxis: [
      {
      type: "category",
      data: ["印尼", "美国", "印度", "中国", "世界人口(万)"],
      // 不显示y轴的线
      axisLine: {
        show: false
      },
      // 不显示刻度
      axisTick: {
        show: false
      },
      // 把刻度标签里面的文字颜色设置为白色
      axisLabel: {
        color: "#fff"
      }
    },
      {
        show: true,
        data: [702, 350, 610, 793, 664],
           // 不显示y轴的线
      axisLine: {
        show: false
      },
      // 不显示刻度
      axisTick: {
        show: false
      },
        axisLabel: {
          textStyle: {
            fontSize: 12,
            color: "#fff"
          }
        }
      }
    ],
需求7: 设置两组柱子层叠以及更换数据
// 给series  第一个对象里面的 添加
yAxisIndex: 0,
// 给series  第二个对象里面的 添加
yAxisIndex: 1,
// series 第一个对象里面的data
data: [70, 34, 60, 78, 69],
// series 第二个对象里面的data
data: [100, 100, 100, 100, 100],
// y轴更换第一个对象更换data数据
data: ["HTML5", "CSS3", "javascript", "VUE", "NODE"],
// y轴更换第二个对象更换data数据
data:[702, 350, 610, 793, 664],
完整代码:
// 柱状图2
(function() {
  var myColor = ["#1089E7", "#F57474", "#56D0E3", "#F8B448", "#8B78F6"];
  // 1. 实例化对象
  var myChart = echarts.init(document.querySelector(".bar2 .chart"));
  // 2. 指定配置和数据
  var option = {
    grid: {
      top: "10%",
      left: "22%",
      bottom: "10%"
      // containLabel: true
    },
    // 不显示x轴的相关信息
    xAxis: {
      show: false
    },
    yAxis: [
      {
        type: "category",
        inverse: true,
        data: ["HTML5", "CSS3", "javascript", "VUE", "NODE"],
        // 不显示y轴的线
        axisLine: {
          show: false
        },
        // 不显示刻度
        axisTick: {
          show: false
        },
        // 把刻度标签里面的文字颜色设置为白色
        axisLabel: {
          color: "#fff"
        }
      },
      {
        data: [702, 350, 610, 793, 664],
        inverse: true,
        // 不显示y轴的线
        axisLine: {
          show: false
        },
        // 不显示刻度
        axisTick: {
          show: false
        },
        // 把刻度标签里面的文字颜色设置为白色
        axisLabel: {
          color: "#fff"
        }
      }
    ],
    series: [
      {
        name: "条",
        type: "bar",
        data: [70, 34, 60, 78, 69],
        yAxisIndex: 0,
        // 修改第一组柱子的圆角
        itemStyle: {
          barBorderRadius: 20,
          // 此时的color 可以修改柱子的颜色
          color: function(params) {
            // params 传进来的是柱子对象
            console.log(params);
            // dataIndex 是当前柱子的索引号
            return myColor[params.dataIndex];
          }
        },
        // 柱子之间的距离
        barCategoryGap: 50,
        //柱子的宽度
        barWidth: 10,
        // 显示柱子内的文字
        label: {
          show: true,
          position: "inside",
          // {c} 会自动的解析为 数据  data里面的数据
          formatter: "{c}%"
        }
      },
      {
        name: "框",
        type: "bar",
        barCategoryGap: 50,
        barWidth: 15,
        yAxisIndex: 1,
        data: [100, 100, 100, 100, 100],
        itemStyle: {
          color: "none",
          borderColor: "#00c1de",
          borderWidth: 3,
          barBorderRadius: 15
        }
      }
    ]
  };

  // 3. 把配置给实例对象
  myChart.setOption(option);
})();
14-折线图1 人员变化模块制作
官网找到类似实例, 适当分析,并且引入到HTML页面中
根据需求定制图表
需求1: 修改折线图大小,显示边框设置颜色:#012f4a,并且显示刻度标签。
    // 设置网格样式
    grid: {
      top: '20%',
      left: '3%',
      right: '4%',
      bottom: '3%',
      show: true,// 显示边框
      borderColor: '#012f4a',// 边框颜色
      containLabel: true // 包含刻度文字在内
    },
需求2: 修改图例组件中的文字颜色 #4c9bfd, 距离右侧 right 为 10%
 // 图例组件
    legend: {
      textStyle: {
        color: '#4c9bfd' // 图例文字颜色
      },
      right: '10%' // 距离右边10%
    },
需求3: x轴相关配置
刻度去除
x轴刻度标签字体颜色:#4c9bfd
剔除x坐标轴线颜色(将来使用Y轴分割线)
轴两端是不需要内间距 boundaryGap
    xAxis: {
      type: 'category',
      data: ["周一", "周二"],
	  axisTick: {
         show: false // 去除刻度线
       },
       axisLabel: {
         color: '#4c9bfd' // 文本颜色
       },
       axisLine: {
         show: false // 去除轴线
       },
       boundaryGap: false  // 去除轴内间距
    },
需求4: y轴的定制
刻度去除
字体颜色:#4c9bfd
分割线颜色:#012f4a
    yAxis: {
      type: 'value',
      axisTick: {
        show: false  // 去除刻度
      },
      axisLabel: {
        color: '#4c9bfd' // 文字颜色
      },
      splitLine: {
        lineStyle: {
          color: '#012f4a' // 分割线颜色
        }
      }
    },
需求5: 两条线形图定制
颜色分别:#00f2f1 #ed3f35
把折线修饰为圆滑 series 数据中添加 smooth 为 true
    color: ['#00f2f1', '#ed3f35'],
	series: [{
      name:'新增粉丝',
      data: [820, 932, 901, 934, 1290, 1330, 1320],
      type: 'line',
      // 折线修饰为圆滑
      smooth: true,
      },{
      name:'新增游客',
      data: [100, 331, 200, 123, 233, 543, 400],
      type: 'line',
      smooth: true,
    }]
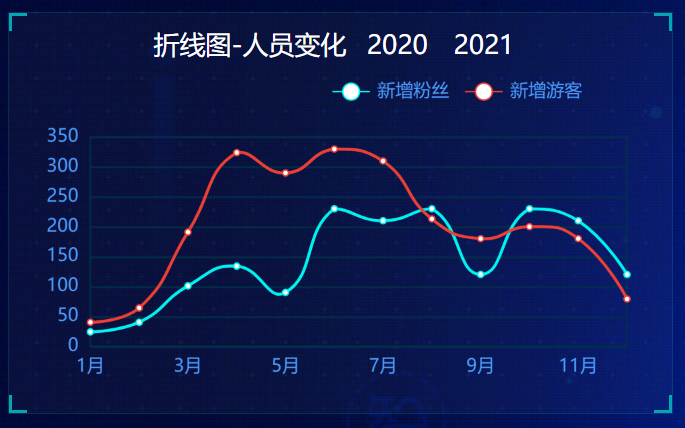
需求6: 配置数据
// x轴的文字
xAxis: {
  type: 'category',
  data: ['1月', '2月', '3月', '4月', '5月', '6月', '7月', '8月', '9月', '10月', '11月', '12月'],
// 图标数据
    series: [{
      name:'新增粉丝',
      data:  [24, 40, 101, 134, 90, 230, 210, 230, 120, 230, 210, 120],
      type: 'line',
      smooth: true
    },{
      name:'新增游客',
      data: [40, 64, 191, 324, 290, 330, 310, 213, 180, 200, 180, 79],
      type: 'line',
      smooth: true
      }
    }]
需求7: 新增需求 点击 2020年 2021年 数据发生变化
以下是后台送过来数据(ajax请求过来的)
 var yearData = [
      {
        year: '2020',  // 年份
        data: [  // 两个数组是因为有两条线
             [24, 40, 101, 134, 90, 230, 210, 230, 120, 230, 210, 120],
             [40, 64, 191, 324, 290, 330, 310, 213, 180, 200, 180, 79]
          ]
      },
      {
        year: '2021',  // 年份
        data: [  // 两个数组是因为有两条线
             [123, 175, 112, 197, 121, 67, 98, 21, 43, 64, 76, 38],
     		[143, 131, 165, 123, 178, 21, 82, 64, 43, 60, 19, 34]
          ]
      }
     ];
tab栏切换事件
点击2020按钮 需要把 series 第一个对象里面的data 换成 2020年对象里面data[0]
点击2020按钮 需要把 series 第二个对象里面的data 换成 2020年对象里面data[1]
2021 按钮同样道理
完整代码:
// 折线图1模块制作
(function() {
  var yearData = [
    {
      year: "2020", // 年份
      data: [
        // 两个数组是因为有两条线
        [24, 40, 101, 134, 90, 230, 210, 230, 120, 230, 210, 120],
        [40, 64, 191, 324, 290, 330, 310, 213, 180, 200, 180, 79]
      ]
    },
    {
      year: "2021", // 年份
      data: [
        // 两个数组是因为有两条线
        [123, 175, 112, 197, 121, 67, 98, 21, 43, 64, 76, 38],
        [143, 131, 165, 123, 178, 21, 82, 64, 43, 60, 19, 34]
      ]
    }
  ];
  // 1. 实例化对象
  var myChart = echarts.init(document.querySelector(".line .chart"));
  // 2.指定配置
  var option = {
    // 通过这个color修改两条线的颜色
    color: ["#00f2f1", "#ed3f35"],
    tooltip: {
      trigger: "axis"
    },
    legend: {
      // 如果series 对象有name 值,则 legend可以不用写data
      // 修改图例组件 文字颜色
      textStyle: {
        color: "#4c9bfd"
      },
      // 这个10% 必须加引号
      right: "10%"
    },
    grid: {
      top: "20%",
      left: "3%",
      right: "4%",
      bottom: "3%",
      show: true, // 显示边框
      borderColor: "#012f4a", // 边框颜色
      containLabel: true // 包含刻度文字在内
    },

    xAxis: {
      type: "category",
      boundaryGap: false,
      data: [
        "1月",
        "2月",
        "3月",
        "4月",
        "5月",
        "6月",
        "7月",
        "8月",
        "9月",
        "10月",
        "11月",
        "12月"
      ],
      axisTick: {
        show: false // 去除刻度线
      },
      axisLabel: {
        color: "#4c9bfd" // 文本颜色
      },
      axisLine: {
        show: false // 去除轴线
      }
    },
    yAxis: {
      type: "value",
      axisTick: {
        show: false // 去除刻度线
      },
      axisLabel: {
        color: "#4c9bfd" // 文本颜色
      },
      axisLine: {
        show: false // 去除轴线
      },
      splitLine: {
        lineStyle: {
          color: "#012f4a" // 分割线颜色
        }
      }
    },
    series: [
      {
        name: "新增粉丝",
        type: "line",
        // true 可以让我们的折线显示带有弧度
        smooth: true,
        data: yearData[0].data[0]
      },
      {
        name: "新增游客",
        type: "line",
        smooth: true,
        data: yearData[0].data[1]
      }
    ]
  };

  // 3. 把配置给实例对象
  myChart.setOption(option);
  // 4. 让图表跟随屏幕自动的去适应
  window.addEventListener("resize", function() {
    myChart.resize();
  });

  // 5.点击切换效果
  $(".line h2").on("click", "a", function() {
    // alert(1);
    // console.log($(this).index());
    // 点击 a 之后 根据当前a的索引号 找到对应的 yearData的相关对象
    // console.log(yearData[$(this).index()]);
    var obj = yearData[$(this).index()];
    option.series[0].data = obj.data[0];
    option.series[1].data = obj.data[1];
    // 需要重新渲染
    myChart.setOption(option);
  });
})();
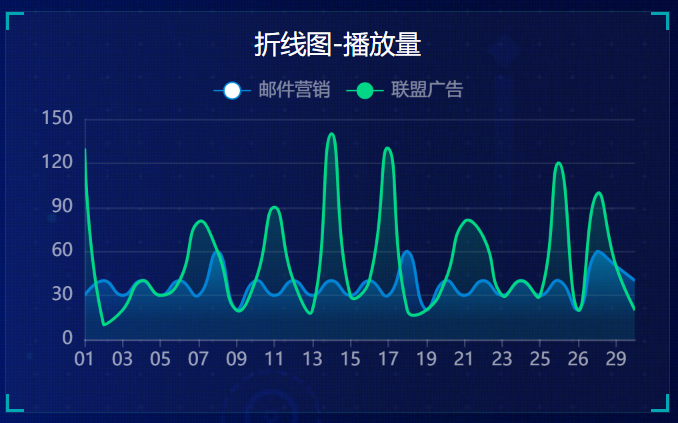
15-折线图2 播放量模块制作
官网找到类似实例, 适当分析,并且引入到HTML页面中
根据需求定制图表
需求1: 更换图例组件文字颜色 rgba(255,255,255,.5) 文字大小为12
 legend: {
      top: "0%",
      textStyle: {
        color: "rgba(255,255,255,.5)",
        fontSize: "12"
      }
},
需求2: 修改图表大小
grid: {
      left: "10",
      top: "30",
      right: "10",
      bottom: "10",
      containLabel: true
    },
需求3: 修改x轴相关配置
修改文本颜色为rgba(255,255,255,.6) 文字大小为 12
x轴线的颜色为 rgba(255,255,255,.2)
     // 文本颜色为rgba(255,255,255,.6)  文字大小为 12
     axisLabel: {
          textStyle: {
            color: "rgba(255,255,255,.6)",
            fontSize: 12
          }
        },
         // x轴线的颜色为   rgba(255,255,255,.2)
        axisLine: {
          lineStyle: {
            color: "rgba(255,255,255,.2)"
          }
        },
需求4: 修改y轴的相关配置
        axisTick: { show: false },
        axisLine: {
          lineStyle: {
            color: "rgba(255,255,255,.1)"
          }
        },
        axisLabel: {
          textStyle: {
            color: "rgba(255,255,255,.6)",
            fontSize: 12
          }
        },
	   // 修改分割线的颜色
        splitLine: {
          lineStyle: {
            color: "rgba(255,255,255,.1)"
          }
        }
需求5: 修改两个线模块配置(注意在series 里面定制)
       //第一条 线是圆滑
       smooth: true,
        // 单独修改线的样式
        lineStyle: {
            color: "#0184d5",
            width: 2
        },
         // 填充区域
        areaStyle: {
              // 渐变色,只需要复制即可
            color: new echarts.graphic.LinearGradient(
              0,
              0,
              0,
              1,
              [
                {
                  offset: 0,
                  color: "rgba(1, 132, 213, 0.4)"   // 渐变色的起始颜色
                },
                {
                  offset: 0.8,
                  color: "rgba(1, 132, 213, 0.1)"   // 渐变线的结束颜色
                }
              ],
              false
            ),
            shadowColor: "rgba(0, 0, 0, 0.1)"
        },
        // 设置拐点 小圆点
        symbol: "circle",
        // 拐点大小
        symbolSize: 8,
        // 设置拐点颜色以及边框
       itemStyle: {
            color: "#0184d5",
            borderColor: "rgba(221, 220, 107, .1)",
            borderWidth: 12
        },
        // 开始不显示拐点, 鼠标经过显示
        showSymbol: false,
       name: "转发量",
        type: "line",
        smooth: true,
        lineStyle: {
          normal: {
            color: "#00d887",
            width: 2
          }
         },
         areaStyle: {
          normal: {
            color: new echarts.graphic.LinearGradient(
              0,
              0,
              0,
              1,
              [
                {
                  offset: 0,
                  color: "rgba(0, 216, 135, 0.4)"
                },
                {
                  offset: 0.8,
                  color: "rgba(0, 216, 135, 0.1)"
                }
              ],
              false
            ),
            shadowColor: "rgba(0, 0, 0, 0.1)"
          }
        },
        // 设置拐点 小圆点
        symbol: "circle",
        // 拐点大小
        symbolSize: 5,
        // 设置拐点颜色以及边框
         itemStyle: {
            color: "#00d887",
            borderColor: "rgba(221, 220, 107, .1)",
            borderWidth: 12
        },
        // 开始不显示拐点, 鼠标经过显示
        showSymbol: false,
需求6: 更换数据
// x轴更换数据
data: [ "01","02","03","04","05","06","07","08","09","10","11","12","13","14","15","16","17","18","19","20","21","22","23","24","25","26","26","28","29","30"],
// series  第一个对象data数据
 data: [ 30, 40, 30, 40,30, 40, 30,60,20, 40, 30, 40, 30, 40,30, 40, 30,60,20, 40, 30, 40, 30, 40,30, 40, 20,60,50, 40],
// series  第二个对象data数据
 data: [ 130, 10, 20, 40,30, 40, 80,60,20, 40, 90, 40,20, 140,30, 40, 130,20,20, 40, 80, 70, 30, 40,30, 120, 20,99,50, 20],
16-饼形图 1年龄分布模块制作

官网找到类似实例, 适当分析,并且引入到HTML页面中
根据需求定制图表
定制图表需求1:
修改图例组件在底部并且居中显示。
每个小图标的宽度和高度修改为 10px
文字大小为12 颜色 rgba(255,255,255,.5)
 legend: {
      // 距离底部为0%
      bottom: "0%",
      // 小图标的宽度和高度
      itemWidth: 10,
      itemHeight: 10,
      data: ['直接访问', '邮件营销', '联盟广告', '视频广告', '搜索引擎'],
      // 修改图例组件的文字为 12px
      textStyle: {
        color: "rgba(255,255,255,.5)",
        fontSize: "12"
      }
 },
定制需求2:
修改水平居中 垂直居中
修改内圆半径和外圆半径为 ["40%", "60%"] pink老师友情提示,带有直角坐标系的比如折线图柱状图是 grid修改图形大小,而我们饼形图是通过 radius 修改大小
series: [
      {
        name: "年龄分布",
        type: "pie",
        // 设置饼形图在容器中的位置
        center: ["50%", "50%"],
        //  修改内圆半径和外圆半径为  百分比是相对于容器宽度来说的
        radius: ["40%", "60%"],
        // 不显示标签文字
        label: { show: false },
        // 不显示连接线
        labelLine: { show: false },
      }
    ]
定制需求3:更换数据
// legend 中的data  可省略
data: ["0岁以下", "20-29岁", "30-39岁", "40-49岁", "50岁以上"],
//  series 中的数据
 data: [
          { value: 1, name: "0岁以下" },
          { value: 4, name: "20-29岁" },
          { value: 2, name: "30-39岁" },
          { value: 2, name: "40-49岁" },
          { value: 1, name: "50岁以上" }
 ] ,
定制需求4: 更换颜色
color: [
          "#065aab",
          "#066eab",
          "#0682ab",
          "#0696ab",
          "#06a0ab",
        ],
 // 4. 让图表跟随屏幕自动的去适应
  window.addEventListener("resize", function() {
    myChart.resize();
  });
17-饼形图2 地区分布模块制作(南丁格尔玫瑰图)

官网找到类似实例, 适当分析,并且引入到HTML页面中
根据需求定制图表
第二步:按照需求定制
需求1:颜色设置
color: ['#006cff', '#60cda0', '#ed8884', '#ff9f7f', '#0096ff', '#9fe6b8', '#32c5e9', '#1d9dff'],
需求2:修改饼形图大小 ( series对象)
radius: ['10%', '70%'],
需求3: 把饼形图的显示模式改为 半径模式
roseType: "radius",
需求4:数据使用更换(series对象 里面 data对象)
          { value: 20, name: '云南' },
          { value: 26, name: '北京' },
          { value: 24, name: '山东' },
          { value: 25, name: '河北' },
          { value: 20, name: '江苏' },
          { value: 25, name: '浙江' },
          { value: 30, name: '四川' },
          { value: 42, name: '湖北' }
需求5:字体略小些 10 px ( series对象里面设置 )
饼图图形上的文本标签可以控制饼形图的文字的一些样式。 label 对象设置
series: [
      {
        name: "面积模式",
        type: "pie",
        radius: [30, 110],
        center: ["50%", "50%"],
        roseType: "radius",
        // 文本标签控制饼形图文字的相关样式, 注意它是一个对象
        label: {
          fontSize: 10
        },
      }
    ]
  };
需求6:防止缩放的时候,引导线过长。引导线略短些 (series对象里面的 labelLine 对象设置 )
连接图表 6 px
连接文字 8 px
        // 文字调整
        label:{
          fontSize: 10
        },
        // 引导线调整
        labelLine: {
          // 连接扇形图线长
          length: 6,
         // 连接文字线长
          length2: 8
        }
     }
    ],
需求6:浏览器缩放的时候,图表跟着自动适配。
// 监听浏览器缩放,图表对象调用缩放resize函数
window.addEventListener("resize", function() {
    myChart.resize();
  });
18-Echarts-map使用(扩展)

(模拟飞机航线)
// 模拟飞行路线模块地图模块
(function () {
  var myChart = echarts.init(document.querySelector(".map .chart"));
  var geoCoordMap = {
    上海: [121.4648, 31.2891],
    东莞: [113.8953, 22.901],
    东营: [118.7073, 37.5513],
    中山: [113.4229, 22.478],
    临汾: [111.4783, 36.1615],
    临沂: [118.3118, 35.2936],
    丹东: [124.541, 40.4242],
    丽水: [119.5642, 28.1854],
    乌鲁木齐: [87.9236, 43.5883],
    佛山: [112.8955, 23.1097],
    保定: [115.0488, 39.0948],
    兰州: [103.5901, 36.3043],
    包头: [110.3467, 41.4899],
    北京: [116.4551, 40.2539],
    北海: [109.314, 21.6211],
    南京: [118.8062, 31.9208],
    南宁: [108.479, 23.1152],
    南昌: [116.0046, 28.6633],
    南通: [121.1023, 32.1625],
    厦门: [118.1689, 24.6478],
    台州: [121.1353, 28.6688],
    合肥: [117.29, 32.0581],
    呼和浩特: [111.4124, 40.4901],
    咸阳: [108.4131, 34.8706],
    哈尔滨: [127.9688, 45.368],
    唐山: [118.4766, 39.6826],
    嘉兴: [120.9155, 30.6354],
    大同: [113.7854, 39.8035],
    大连: [122.2229, 39.4409],
    天津: [117.4219, 39.4189],
    太原: [112.3352, 37.9413],
    威海: [121.9482, 37.1393],
    宁波: [121.5967, 29.6466],
    宝鸡: [107.1826, 34.3433],
    宿迁: [118.5535, 33.7775],
    常州: [119.4543, 31.5582],
    广州: [113.5107, 23.2196],
    廊坊: [116.521, 39.0509],
    延安: [109.1052, 36.4252],
    张家口: [115.1477, 40.8527],
    徐州: [117.5208, 34.3268],
    德州: [116.6858, 37.2107],
    惠州: [114.6204, 23.1647],
    成都: [103.9526, 30.7617],
    扬州: [119.4653, 32.8162],
    承德: [117.5757, 41.4075],
    拉萨: [91.1865, 30.1465],
    无锡: [120.3442, 31.5527],
    日照: [119.2786, 35.5023],
    昆明: [102.9199, 25.4663],
    杭州: [119.5313, 29.8773],
    枣庄: [117.323, 34.8926],
    柳州: [109.3799, 24.9774],
    株洲: [113.5327, 27.0319],
    武汉: [114.3896, 30.6628],
    汕头: [117.1692, 23.3405],
    江门: [112.6318, 22.1484],
    沈阳: [123.1238, 42.1216],
    沧州: [116.8286, 38.2104],
    河源: [114.917, 23.9722],
    泉州: [118.3228, 25.1147],
    泰安: [117.0264, 36.0516],
    泰州: [120.0586, 32.5525],
    济南: [117.1582, 36.8701],
    济宁: [116.8286, 35.3375],
    海口: [110.3893, 19.8516],
    淄博: [118.0371, 36.6064],
    淮安: [118.927, 33.4039],
    深圳: [114.5435, 22.5439],
    清远: [112.9175, 24.3292],
    温州: [120.498, 27.8119],
    渭南: [109.7864, 35.0299],
    湖州: [119.8608, 30.7782],
    湘潭: [112.5439, 27.7075],
    滨州: [117.8174, 37.4963],
    潍坊: [119.0918, 36.524],
    烟台: [120.7397, 37.5128],
    玉溪: [101.9312, 23.8898],
    珠海: [113.7305, 22.1155],
    盐城: [120.2234, 33.5577],
    盘锦: [121.9482, 41.0449],
    石家庄: [114.4995, 38.1006],
    福州: [119.4543, 25.9222],
    秦皇岛: [119.2126, 40.0232],
    绍兴: [120.564, 29.7565],
    聊城: [115.9167, 36.4032],
    肇庆: [112.1265, 23.5822],
    舟山: [122.2559, 30.2234],
    苏州: [120.6519, 31.3989],
    莱芜: [117.6526, 36.2714],
    菏泽: [115.6201, 35.2057],
    营口: [122.4316, 40.4297],
    葫芦岛: [120.1575, 40.578],
    衡水: [115.8838, 37.7161],
    衢州: [118.6853, 28.8666],
    西宁: [101.4038, 36.8207],
    西安: [109.1162, 34.2004],
    贵阳: [106.6992, 26.7682],
    连云港: [119.1248, 34.552],
    邢台: [114.8071, 37.2821],
    邯郸: [114.4775, 36.535],
    郑州: [113.4668, 34.6234],
    鄂尔多斯: [108.9734, 39.2487],
    重庆: [107.7539, 30.1904],
    金华: [120.0037, 29.1028],
    铜川: [109.0393, 35.1947],
    银川: [106.3586, 38.1775],
    镇江: [119.4763, 31.9702],
    长春: [125.8154, 44.2584],
    长沙: [113.0823, 28.2568],
    长治: [112.8625, 36.4746],
    阳泉: [113.4778, 38.0951],
    青岛: [120.4651, 36.3373],
    韶关: [113.7964, 24.7028],
  };

  var XAData = [
    [{ name: "西安" }, { name: "拉萨", value: 100 }],
    [{ name: "西安" }, { name: "上海", value: 100 }],
    [{ name: "西安" }, { name: "广州", value: 100 }],
    [{ name: "西安" }, { name: "西宁", value: 100 }],
    [{ name: "西安" }, { name: "银川", value: 100 }],
  ];

  var XNData = [
    [{ name: "西宁" }, { name: "北京", value: 100 }],
    [{ name: "西宁" }, { name: "上海", value: 100 }],
    [{ name: "西宁" }, { name: "广州", value: 100 }],
    [{ name: "西宁" }, { name: "西安", value: 100 }],
    [{ name: "西宁" }, { name: "银川", value: 100 }],
  ];

  var YCData = [
    [{ name: "拉萨" }, { name: "潍坊", value: 100 }],
    [{ name: "拉萨" }, { name: "哈尔滨", value: 100 }],
    [{ name: "银川" }, { name: "上海", value: 100 }],
    [{ name: "银川" }, { name: "西安", value: 100 }],
    [{ name: "银川" }, { name: "西宁", value: 100 }],
  ];

  var planePath =
    "path://M1705.06,1318.313v-89.254l-319.9-221.799l0.073-208.063c0.521-84.662-26.629-121.796-63.961-121.491c-37.332-0.305-64.482,36.829-63.961,121.491l0.073,208.063l-319.9,221.799v89.254l330.343-157.288l12.238,241.308l-134.449,92.931l0.531,42.034l175.125-42.917l175.125,42.917l0.531-42.034l-134.449-92.931l12.238-241.308L1705.06,1318.313z";
  //var planePath = 'arrow';
  var convertData = function (data) {
    var res = [];
    for (var i = 0; i < data.length; i++) {
      var dataItem = data[i];

      var fromCoord = geoCoordMap[dataItem[0].name];
      var toCoord = geoCoordMap[dataItem[1].name];
      if (fromCoord && toCoord) {
        res.push({
          fromName: dataItem[0].name,
          toName: dataItem[1].name,
          coords: [fromCoord, toCoord],
          value: dataItem[1].value,
        });
      }
    }
    return res;
  };

  var color = ["#a6c84c", "#ffa022", "#46bee9"]; //航线的颜色
  var series = [];
  [
    ["西安", XAData],
    ["西宁", XNData],
    ["银川", YCData],
  ].forEach(function (item, i) {
    series.push(
      {
        name: item[0] + " Top3",
        type: "lines",
        zlevel: 1,
        effect: {
          show: true,
          period: 6,
          trailLength: 0.7,
          color: "red", //arrow箭头的颜色
          symbolSize: 3,
        },
        lineStyle: {
          normal: {
            color: color[i],
            width: 0,
            curveness: 0.2,
          },
        },
        data: convertData(item[1]),
      },
      {
        name: item[0] + " Top3",
        type: "lines",
        zlevel: 2,
        symbol: ["none", "arrow"],
        symbolSize: 10,
        effect: {
          show: true,
          period: 6,
          trailLength: 0,
          symbol: planePath,
          symbolSize: 15,
        },
        lineStyle: {
          normal: {
            color: color[i],
            width: 1,
            opacity: 0.6,
            curveness: 0.2,
          },
        },
        data: convertData(item[1]),
      },
      {
        name: item[0] + " Top3",
        type: "effectScatter",
        coordinateSystem: "geo",
        zlevel: 2,
        rippleEffect: {
          brushType: "stroke",
        },
        label: {
          normal: {
            show: true,
            position: "right",
            formatter: "{b}",
          },
        },
        symbolSize: function (val) {
          return val[2] / 8;
        },
        itemStyle: {
          normal: {
            color: color[i],
          },
          emphasis: {
            areaColor: "#2B91B7",
          },
        },
        data: item[1].map(function (dataItem) {
          return {
            name: dataItem[1].name,
            value: geoCoordMap[dataItem[1].name].concat([dataItem[1].value]),
          };
        }),
      }
    );
  });
  var option = {
    tooltip: {
      trigger: "item",
      formatter: function (params, ticket, callback) {
        if (params.seriesType == "effectScatter") {
          return "线路:" + params.data.name + "" + params.data.value[2];
        } else if (params.seriesType == "lines") {
          return (
            params.data.fromName +
            ">" +
            params.data.toName +
            "<br />" +
            params.data.value
          );
        } else {
          return params.name;
        }
      },
    },
    legend: {
      orient: "vertical",
      top: "bottom",
      left: "right",
      data: ["西安 Top3", "西宁 Top3", "银川 Top3"],
      textStyle: {
        color: "#fff",
      },
      selectedMode: "multiple",
    },
    geo: {
      map: "china",
      label: {
        emphasis: {
          show: true,
          color: "#fff",
        },
      },
      // 把中国地图放大了1.2倍
      zoom: 1.2,
      roam: true,
      itemStyle: {
        normal: {
          // 地图省份的背景颜色
          areaColor: "rgba(20, 41, 87,0.6)",
          borderColor: "#195BB9",
          borderWidth: 1,
        },
        emphasis: {
          areaColor: "#2B91B7",
        },
      },
    },
    series: series,
  };
  myChart.setOption(option);
  // 监听浏览器缩放,图表对象调用缩放resize函数
  window.addEventListener("resize", function () {
    myChart.resize();
  });
})();
实现步骤:
第一需要下载china.js提供中国地图的js文件
第二个因为里面代码比较多,我们新建一个新的js文件 myMap.js 引入
使用社区提供的配置即可,社区地址已废弃
需要修改:
去掉标题组件
去掉背景颜色
修改地图省份背景 #142957 areaColor 里面做修改
地图放大通过 zoom 设置为1.2即可
    geo: {
      map: 'china',
      zoom: 1.2,
      label: {
        emphasis: {
          show: false
        }
      },
      roam: false,
      itemStyle: {
        normal: {
          areaColor: '#142957',
          borderColor: '#0692a4'
        },
        emphasis: {
          areaColor: '#0b1c2d'
        }
      }
    },
19- 最后约束缩放
/* 约束屏幕尺寸 */
@media screen and (max-width: 1024px) {
  html {
    font-size: 42px !important;
  }
}
@media screen and (min-width: 1920px) {
  html {
    font-size: 80px !important;
  }
}
Vue3中使用echarts
1、安装相关依赖
npm install echarts vue-echarts
2、导入和配置
在项目文件main.js全局引入Echarts文件:
import * as echarts from 'echarts/core';也可在页面中单独引入使用:
import * as echarts from ‘echarts’在页面组件中准备容器放置图表
// ref 为了能够拿到图表函数 <div ref="chart" style="width: 600px;height: 400px"></div>在js代码块中引入需要用到的函数或者方法:
import * as echarts from 'echarts'
import {onMounted, ref} from "vue";
3、定义一个响应式的值,用于传递图表:const chart = ref();
4、创建一个函数存放图表:
const init =()=> {
    const myChart = echarts.init(chart.value);

    // 此处粘贴图表代码
    let option = {

    }

    myChart.setOption(option)
}
5、在js中创建一个onMounted初始化函数,一进入页面就会调用此函数;并在此调用定义的放图表的函数
onMounted(() => {
    // 调用函数 处理图表将其渲染到页面
    init()
})