uniapp+vue通信
对象解构的时候,直接单使用export就行,不可以加default
export default{}:默认导出一个对象, import导入时不需要加大括号
export导出单个变量
JavaScript浏览器不支持module,引入type="module"
flex-direaction:row/column用于页面布局横纵方向
scroll-y:即可纵向滑动
scroll-x:需white-space:nowrap和display:inline-block
label下多个label点击默认第一个
页面跳转
api跳转:function navigateTo(){

		uni.navigateTo({

			url:'./demo1?id=1&name=uniapp'

		})

	}

// demo.vue页面(目标跳转页)接受参数

	export default {

		onLoad: function (option) { //option为object类型,会序列化上个页面传递的参数

			console.log(option.id); //打印出上个页面传递的参数。

		}

	}


//声明式跳转
navigator标签
图片:
uni.chooseImage({
	count: 6, //默认9
	sizeType: ['original', 'compressed'], //可以指定是原图还是压缩图,默认二者都有
	sourceType: ['album'], //从相册选择
	success: function (res) {
		console.log(JSON.stringify(res.tempFilePaths));
	}
});
图片预览
uni.previewImage({
    current:,    //当前显示图片的链接/索引值
    urls:        //需要预览图片的链接,数组
})
页面提示showToast
  function show(){
	  uni.showToast({
	      title: '操作失败,请重试',
	      icon: 'none',
	      duration: 3000
	  });
  }
页面跳转后销毁
	//销毁
	 uni.reLaunch({

		url: './demo1?id=1&name=ui'

		 });
<template>
<ChildComponent ref="childComp" /> //子组件
<button @click="callChildMethod">调用子组件方法</button>
</template>
<script setup>
import { ref } from 'vue';
import ChildComponent from './ChildComponent.vue';
const childComp = ref(null);
const callChildMethod = () => {
if (childComp.value) {
childComp.value.doSomething();
console.log(childComp.value.computedData);
}
};
</script>自定义导航
例子:uniapp顶部导航栏及按钮的自定义事件_uniapp titlenview 按钮效果-CSDN博客
mescroll组件
1、import { onPageScroll, onReachBottom,onNavigationBarButtonTap } from '@dcloudio/uni-app';
2、从onPageScroll和nonReachBottom解构出mescrollInit和getMescroll     const { mescrollInit, getMescroll } = useMescroll(onPageScroll, onReachBottom);
 <mescroll-body @init="mescrollInit" :down="{ auto: false }" @down="onDown" @up="onUp">
	    <!-- 采购单列表 -->
	    <OutgoingList :list="outgoingList"/>
</mescroll-body>

 uni.pageScrollTo({				//使页面滚回顶部
    scrollTop: 0,
  });
props是父<---->子,在子中用defineProps([])
- 若 父传子:属性值是**非函数**。
- 若 子传父:属性值是**函数**。 通过函数来传递参数,得到的参数即为需要的值
父组件:

```vue

<template>

  <div class="father">

    <h3>父组件,</h3>

		<h4>我的车:{{ car }}</h4>

		<h4>儿子给的玩具:{{ toy }}</h4>

		<Child :car="car" :getToy="getToy"/>

  </div>

</template>

<script setup lang="ts" name="Father">

	import Child from './Child.vue'

	import { ref } from "vue";

	// 数据

	const car = ref('奔驰')

	const toy = ref()

	// 方法

	function getToy(value:string){

		toy.value = value

	}

</script>

```
子组件
```vue
<template>
<div class="child">
<h3>子组件</h3>
<h4>我的玩具:{{ toy }}</h4>
<h4>父给我的车:{{ car }}</h4>
<button @click="getToy(toy)">玩具给父亲</button>
</div>
</template>
<script setup lang="ts" name="Child">
import { ref } from "vue";
const toy = ref('奥特曼')
defineProps(['car','getToy'])
</script>const emitter=emit()
emitter.on(事件名,()=>{}) //订阅
emitter.emit() //发布 触发事件<template>
<zVue #s1>
<ul>
<li>11</li>
</ul>
</zVue>
<zVue #s2>
<ul>
<li>2</li>
</ul>
</zVue>
</template>
<script setup>
import zVue from "./z.vue";
</script>
<style>
</style>
插槽可用于类似的共同partwatch监视对象
<template>
  <div class="person">
    <h1>情况二:监视【ref】定义的【对象类型】数据</h1>
    <h2>姓名:{{ person.name }}</h2>
    <h2>年龄:{{ person.age }}</h2>
    <button @click="changeName">修改名字</button>
    <button @click="changeAge">修改年龄</button>
    <button @click="changePerson">修改整个人</button>
  </div>
</template>

<script lang="ts" setup name="Person">
  import {ref,watch} from 'vue'
  // 数据
  let person = ref({
    name:'张三',
    age:18
  })
  // 方法
  function changeName(){
    person.value.name += '~'
  }
  function changeAge(){
    person.value.age += 1
  }
  function changePerson(){
    person.value = {name:'李四',age:90}
  }
  /*
    监视,情况一:监视【ref】定义的【对象类型】数据,监视的是对象的地址值,若想监视对象内部属性的变化,需要手动开启深度监视
    watch的第一个参数是:被监视的数据
    watch的第二个参数是:监视的回调
    watch的第三个参数是:配置对象(deep、immediate等等.....)
  */
  watch(person,(newValue,oldValue)=>{
    console.log('person变化了',newValue,oldValue)
  },{deep:true})

</script>
```
computed计算属性
<script setup lang="ts" name="App">
  import {ref,computed} from 'vue'

  let firstName = ref('zhang')
  let lastName = ref('san')

  // 计算属性——只读取,不修改
  // let fullName = computed(()=>{
  //   return firstName.value + '-' + lastName.value
  // })
  // 计算属性——既读取又修改
  let fullName = computed({
    // 读取
    get(){
      return firstName.value + '-' + lastName.value
    },
    // 修改
    set(val){
      console.log('有人修改了fullName',val)
      firstName.value = val.split('-')[0]
      lastName.value = val.split('-')[1]
    }
  })

  function changeFullName(){
    fullName.value = 'li-si'
  }
@confirm:确定
底部导航
	"tabBar": {
          list:[{pagePath:"",text:"tab上文字",iconPath:"",selectedIconPath:"选中时的图标"},{}]
    }
Imgae
aspectFit:截长
aspectFill:截短
下拉刷新
enablePullDownRefresh:true
<script>
onPullDownRefresh() {    //下拉刷新
		console.log('refresh');
		setTimeout(function () {
			uni.stopPullDownRefresh();    //定时器,取消下拉刷新
		}, 1000);
	}
</script>
上拉加载
import {onReachBottom} from ''
onReachBottomDistance:200
onReachBottom与onload同级的回调函数
onReachBottom(()=>{
		console.log('触底');
		console.log(list.value);
		list.value.forEach((item)=>{
			list.value.push({"id":item.id,"name":item.name})
		})
	})
axios请求
const result = await noticeApi.queryEmployeeNotice(queryForm);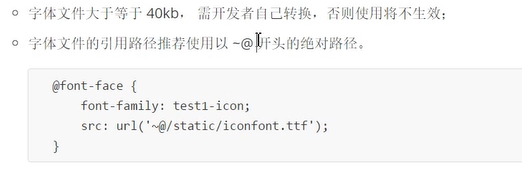

defineProps:父子相传
子传给父需要函数作为桥梁自定义事件:子传父
通过const emit=defineEmits(['事件名'])
emit('事件名')调用
emitter
实现组件通信
接收:订阅消息,通过emitter.on('事件名',(接收到的参数)=>{})绑定
发出数据:发布消息,通过emitter.emit('事件名',传递的参数)触发
defineExpose暴露,子组件暴露,给父组件数据 子传父
1、子组件内使用对象形式传送,defineExpose({ count,
increment //函数})
2、父组件内,拿到子组件的实例对象 <ChildComponent ref="childRef" />
let childRed=ref(null) //挂载前子组件的实例对象是空的
onMounted(() => {
if (childRef.value) {
// 可以访问子组件暴露出来的count和increment
console.log(childRef.value.count.value);
childRef.value.increment();
}
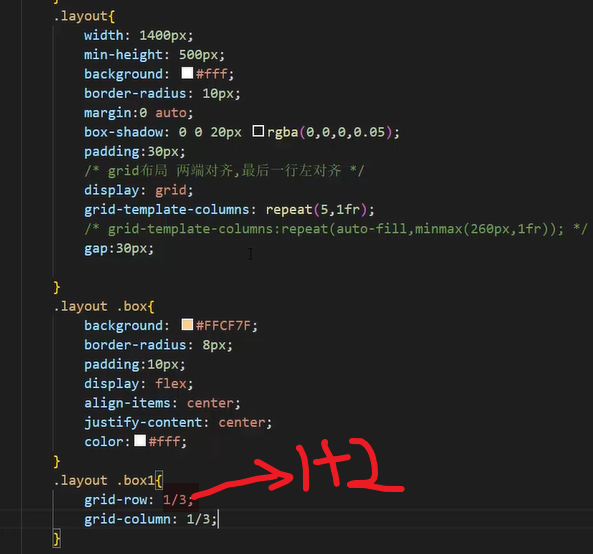
});网格布局grid
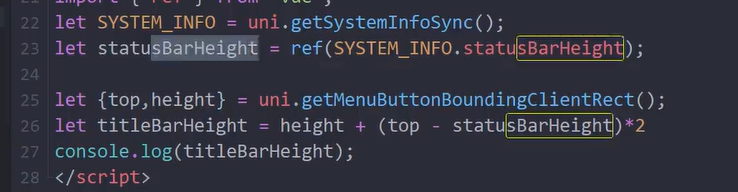
自定义状态栏
1、status部分

2、胶囊的高度值
uniapp插槽
输入框
<uni-easyinput>
	<template #right>
		<view>密码</view>
	</template>
</uni-easyinput>
卡片插槽
<uni-card :title="title" spacing="0">
			<!-- 插槽 -->
			<template v-slot:title>
				<view style="padding: 0;">hhhhhh</view>
				<view>----------------------------------</view>
			</template>
</uni-card>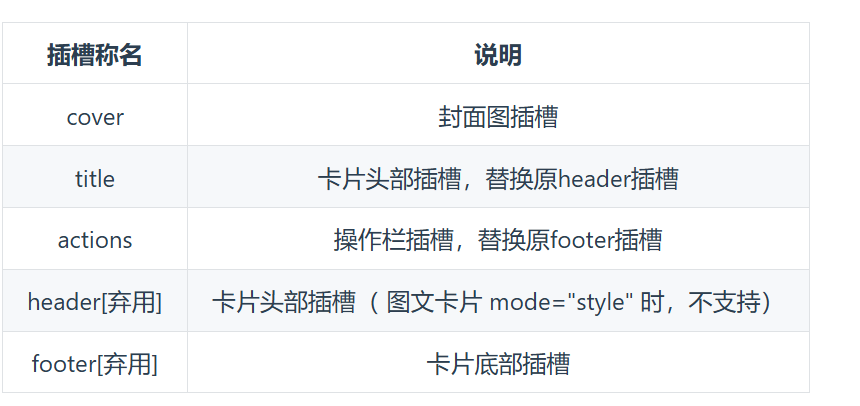
步骤条插槽版
 <up-steps :current="1" class="change">
                <up-steps-item error :title="`库存初值(${ item.goodsOriginNumber })`">
                  <template #icon>
                    <view class="custom-icon">
                      <text class="slot-icon-first">初</text>
                    </view>
                  </template>
                </up-steps-item>
                <up-steps-item :title="`库存终值(${ item.goodsEndNumber })`" >
                  <template #icon>
                    <view class="custom-icon">
                      <text class="slot-icon">终</text>
                    </view>
                  </template>
                </up-steps-item>
</up-steps>uniapp+vue通信
http://localhost:8090//archives/es6de-module